Marple
Remembers - 2003
The Ypres Salient
By Ian Rice
Day
3 p1 ![]()
![]()
![]() Day 4
Day 4
|
WEDNESDAY 17th APRIL 2003 (Day 3, part 2) HILL 60
The afternoon began at Hill 60. There is no cemetery here although it is estimated that anywhere between 4,000 and 8,000 men still lie undiscovered beneath its blasted surface. Although a mere sixty metres high (hence its name) this small rise dominated the plain leading on to Ypres. Even today it is clear that the still-uninterrupted view must have made it a place of importance to both sides. It is not surprising, therefore, to learn that it was fought over throughout the war and again in 1940. It was subjected to attack by poison gas and subterranean mining and it is here that one of our party believes his great-uncle still lies. Only a few days before our departure Alan E had discovered that his great-uncle, Sapper Walter Griffiths, had died while attached to a Tunnelling Company of the Royal Engineers. He discovered also that Walter's name is on the Menin Gate, indicating that he has no known grave. From the date of his death it is likely that he died during the extensive tunnelling operations under Hill 60.
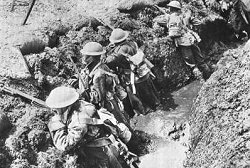
As the new defenders of Hill 60 began to consolidate their positions they had time to look around them. Although it dominated the view towards Ypres it was itself overlooked by surrounding, taller hills including, just across the adjoining railway cutting, a higher ridge known as The Caterpillar. On to these higher positions the enemy were soon in the process of cramming fifty artillery batteries - up to 300 guns of various calibres. To respond to this threat the British had very few artillery pieces and these were extremely short on ammunition, which was being rationed in preparation for a forthcoming offensive in another part of the Salient. Soon the German guns opened up on Hill 60. The nearest were so close that they could fire over open sights. The top of the hill disappeared in a cloud of explosions as whole platoons were wiped out and those remaining dug furiously into the steep, blasted sides of the craters, desperate to find some cover. Throughout the night they endured the barrage, augmented by grenades hurled from the enemy trenches only yards away. With the dawn came the expected counter-attack.
Leading his men in defence of one crater, Lieutenant George Roupell was wounded eight times but refused to be evacuated. Using everything at their disposal he and his men repulsed repeated attacks. During a brief lull he retired to have his wounds dressed and to request reinforcements. Not long after Roupell had left it to return to his men the Headquarters position was hit by heavy shellfire causing many casualties. Back with his dwindling band of defenders and despite his wounds Roupell continued to hold his position, still under murderous German shellfire. No reinforcements had arrived and his company was still further weakened through casualties. He once again personally ran the gauntlet to the rear. He managed to organise some reinforcements that he brought back to his beleaguered position, which he held until relieved the next morning. For these actions Lt. Roupell was awarded the Victoria Cross. His citation reads:
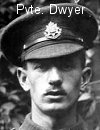
Not very far away from Lt. Roupell, Private Edward Dwyer was busy winning his Victoria Cross. This nineteen-year-old had already seen his closest friends killed and on several occasions had left his trench to treat some of his wounded comrades. When he saw some Germans trying to work around to the flank and rear of his position, without apparent thought to his own safety, Dwyer jumped onto the parapet of his position and though under heavy fire himself, opened up with rifle and grenades on the assaulting forces. He dispersed the attack and won his VC. His citation describe his actions thus:
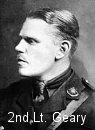
Acting in support of Lt. Roupell, Second Lieutenant Benjamin Geary had secured the left-hand crater and with his few men had gallantly defended it against repeated assaults. The three runners he had sent for help had all been killed so he went personally to the rear, under heavy fire, where he was able to organise a small group of reinforcements including some men from the Bedfordshire regiment. Returning with them he continued to lead the defence by reckless example until he was hit in the eye by shrapnel early on 21st April. He, too, was awarded the Victoria Cross:
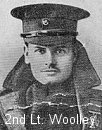
Over on the right of the hilltop Second Lieutenant G. Harold Wooley of the Queen Victoria's Rifles and his men were under such a constant barrage from German guns on the Caterpillar that almost no movement of any kind was possible. Heavy machine-gun fire added to the carnage. When Lieutenant Kennedy in an adjacent crater was wounded, Wooley took over his men too. As the British troops began to run short of ammunition and as casualties steadily rose there began a move towards the rear that would have left the whole hilltop position exposed. Wooley was able to stem this retreat and was able to feed a few reinforcements from the Devonshire Regiment and the Queen Victoria's Rifles into the position. Some time later, after suffering further casualties, Wooley made the perilous journey back to Headquarters to seek further reinforcements. It took two trips, each under murderous fire, before he was able to begin to return with 30 men for the Devonshire Regiment. Somehow these men were redirected elsewhere before he could get them into his position. He did manage to get a few to follow him and also picked up some members of the Northumberland Fusiliers. With these and the remnants of his own platoon, Wooley was able to hold out and for this was awarded the fourth Victoria Cross of the action. His was the first VC won by a Territorial Army soldier during the Great War. As his citation explains:
Eventually the ferocity of the German assaults lessened and the British survivors were able to consolidate their position and build up their defences. In May the Germans attacked again, this time under cover of a cloud of poison gas. The British troops withstood one attack even though a whole battalion of the Dorset Regiment was effectively wiped out. However, a second gas attack two days later was successful and the top of the hill, so dearly bought, reverted to German control, only to be recaptured by Australian troops in 1917.
All this horror was described by Andy so vividly that, despite the sunshine and the spring blossoms, for a brief time we could all imagine ourselves back there amid the carnage and suffering, witnessing the mad bravery of the soldiers. The four VCs, though worthily won, must only stand as typical examples of the courage and recklessness that must have been commonplace under those hellish conditions. The hill now has three memorials on it. One is to the Queen Victoria's Rifles, which was the only Territorial Army unit involved in the 1915 action. The original memorial was damaged during the Second World War and was subsequently replaced. Near the car park is a memorial to the 14th Light Division and on the road, near the little bar, is one to the 1st Australian Tunnelling Company. It was here that Alan E laid a small wreath to the memory of his dead great-uncle, Sapper Griffiths. It was a very pensive group that made its way down the hill to the little bar at its foot where the ancient patron has a small museum of rusting relics. As a reminder that Germany also invaded this area again, by the car park is a small memorial to two Belgians who were shot while escaping from a German deportation train during the Second World War. THE THIRD BATTLE OF YPRES (PASSCHENDAELE) - 31st JULY to 12th NOVEMBER 1917
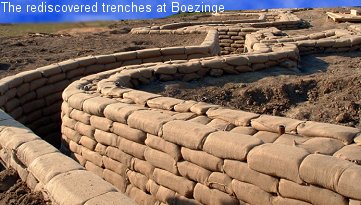
VARLET FARM The rest of the afternoon was to be devoted to the archaeological investigation of the Great War around Ypres. First we visited Varlet Farm. This old farm, situated between Passchendaele and Poelkapelle, was part of the German front line. Various excavations have uncovered trenches and at least one machine-gun strong point. In the barn and in large piles outside, Charlotte Cardoen-Descamps, the proprietrix, showed us some of the munitions and equipment that are regularly unearthed by her husband, Dirk, as he goes about his daily work on the farm. She calculates that an average annual crop from his potato fields yields about 20 - 30 live shells and probably the same number of live hand grenades. They keep no count of the small arms ammunition or the other, less dangerous items they discover. Once or twice a year the bomb disposal teams from the Belgian Army collect the live munitions for appropriate disposal. In the case of gas shells this is becoming a national problem. Still deadly after all this time, they can only be made safe at a special installation and then only one shell at a time. At the current rate of treating only five shells a day, and taking no account of future finds, it is estimated that it will take a minimum of thirty years to clear the present stockpile. Varlet Farm, on its original site, was assaulted by sailors of the Royal Naval Division, supported by the Artists Rifles. During October and November 1917, the Hood Battalion attacked and finally took the position although the farm buildings were reduced to a ruin in the process. The present buildings were erected in 1920 under a government scheme financed from post-war reparations paid by Germany. Over coffee in the new building, where she is happy to welcome bed and breakfast guests, Charlotte showed us copies of old trench maps and described the attack that led to the farm's liberation by British sailors in 1917. BOEZINGE Our final stop was on an industrial estate just outside Boezinge. Here a group of Belgian amateur archaeologists known as The Diggers have uncovered a forgotten part of the front line. Few professional archaeologists in Belgium devote their efforts to the Great War so The Diggers have been licensed to carry out appropriate investigations. When work commenced on the construction of the industrial estate they were asked to work ahead of the builders to record any finds unearthed by them. What they uncovered surprised everyone. Jacque, a friend of Andy's and an ex-member of The Diggers, acted as our guide to the excavations. He was able to describe how they had unearthed the German and British front line trenches. Here they were only a few hundred yards apart and well within sight of each other. The excavations produced staggering amounts of ammunition including thousands of rounds of live bullets, boxes of grenades and vast quantities of cartridge cases. The latter items suggested that a battle of some ferocity had taken place here. It took a great deal of research to piece together the evidence but eventually Jacque and The Diggers were able to add a forgotten battle to the recorded history of the war. Fleeing French soldiers, escaping the first gas attack at Langemarck in April 1915, established the first defences here at Boezinge to stem the German advance that ensued. They were subsequently relieved by British units who dug new defences slightly behind the original French trenches. On 6th July 1915, following a heavy artillery barrage, the British attacked the German lines. In the ensuing battle more than 600 British soldiers were killed for an advance, at its deepest, of only thirty yards.
Later in the excavations two complete skeletons were discovered. They were identified as unnamed soldiers of the Royal Welch Fusiliers. Their remains were found between the front lines and it is assumed that they were manning a listening-post in no-man's-land sometime in 1917 when they were killed and subsequently buried by artillery fire. Much of the early excavations by The Diggers are now covered by the industrial estate but one section of the British line has been acquired by the Municipality of Ypres and is being restored. It includes a large dugout complex of thirteen underground rooms that in 1915 would almost certainly have been a battalion headquarters. When it was first opened up by the archaeologists it was found to contain all the original contents including clothes still hanging from its panelled walls as though their owners had just stepped out for a moment and would soon return to claim them. The trench and the dugout had been abandoned during the 3rd Battle of Ypres so it is impossible to know if the occupants ever managed to survive the war and return home. I wonder what their thoughts would be about their old underground home being turned into a memorial?
Before the ceremony Alan E and Kath placed a cross and a poppy below plaque No 8, the one that bears the name of Sapper Griffiths, Alan's great-uncle. The various members of our group spent the rest of the evening in different ways. Some, like Alan, Kath and myself, opted for a quiet dinner while others sought out a bar with satellite television where they could watch the Manchester United v Arsenal match. I took this opportunity to sample a local delicacy - eel in a spinach sauce. It was surprisingly light and very tasty. As we ate we had a wonderful view of the Market Square of Ypres and its beautiful, subtly illuminated reconstructed buildings, dominated by the ornate Cloth Hall. It was a perfect end to our stay in this ancient and historic city.
|
Day
3 p1 ![]()
![]()
![]() Day 4
Day 4
![]()
Top
 By
1915, when British troops took over this part of the line from
the French, Hill 60 already had a fearsome reputation. It
continued to deserve it as repeated assaults by the British
failed to move the enemy defenders from their trenches. For
example, the 1st Battalion of the Dorsetshire regiment lost
sixteen men in June 1915 when the Germans opened a surprise
artillery bombardment on Trench 39 that ran along the base of
the hill. Despite doing considerable damage to the trench there
was no follow-up attack.
By
1915, when British troops took over this part of the line from
the French, Hill 60 already had a fearsome reputation. It
continued to deserve it as repeated assaults by the British
failed to move the enemy defenders from their trenches. For
example, the 1st Battalion of the Dorsetshire regiment lost
sixteen men in June 1915 when the Germans opened a surprise
artillery bombardment on Trench 39 that ran along the base of
the hill. Despite doing considerable damage to the trench there
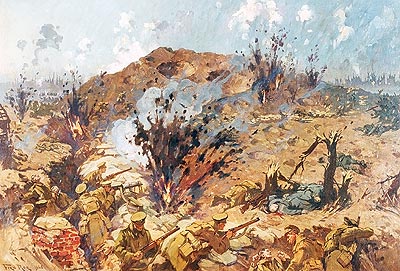
was no follow-up attack.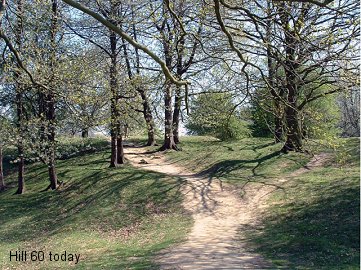 We
gathered round Andy as he graphically brought to life the terrible
fighting that took place on this spot. By April 1915 the enemy was
heavily entrenched on and around the hill. It was becoming essential to
remove them but the commanders were faced with a dilemma. The position
was too big to be taken by a raid but too small to warrant an all-out
assault. Their solution was to sap under the defences and place five
mines 100 feet below the surface. On the evening of 17th April 1915
these mines were detonated, one at a time, at ten second intervals.
Great chunks of the hilltop disappeared, taking around 800 German
soldiers with it and leaving deep craters that are still visible today.
Now years of exposure to the weather and a covering of grass soften
their edges. The trees today were springing into new leaf and some were
decorated with gentle white blossoms. In 1915 it would have been an
infernal tableau of blasted tree trunks, gaping, smoking craters and
unimaginable carnage. Those of the enemy manning the defences who were
not blown to pieces would have been staggering around, horribly injured
in both body and mind. Not surprisingly the assaulting British troops
were able to gain the top of the hill with ease. It was considered the
most successful attack of its kind of the war up to that date.
We
gathered round Andy as he graphically brought to life the terrible
fighting that took place on this spot. By April 1915 the enemy was
heavily entrenched on and around the hill. It was becoming essential to
remove them but the commanders were faced with a dilemma. The position
was too big to be taken by a raid but too small to warrant an all-out
assault. Their solution was to sap under the defences and place five
mines 100 feet below the surface. On the evening of 17th April 1915
these mines were detonated, one at a time, at ten second intervals.
Great chunks of the hilltop disappeared, taking around 800 German
soldiers with it and leaving deep craters that are still visible today.
Now years of exposure to the weather and a covering of grass soften
their edges. The trees today were springing into new leaf and some were
decorated with gentle white blossoms. In 1915 it would have been an
infernal tableau of blasted tree trunks, gaping, smoking craters and
unimaginable carnage. Those of the enemy manning the defences who were
not blown to pieces would have been staggering around, horribly injured
in both body and mind. Not surprisingly the assaulting British troops
were able to gain the top of the hill with ease. It was considered the
most successful attack of its kind of the war up to that date. Three
companies of the Duke of Wellington's Regiment were holding the craters:
perhaps around 600 men. In the to-and-fro of the ensuing battle,
following bayonet charges and countercharges, this force lost 15
officers and 406 other ranks. But they held. On 20th April about 260 men
of the East Surrey Regiment crawled forwards over the dead and mangled
bodies of their comrades to reinforce the position. The German barrage
and counterattacks continued with, if anything, increased ferocity.
Three
companies of the Duke of Wellington's Regiment were holding the craters:
perhaps around 600 men. In the to-and-fro of the ensuing battle,
following bayonet charges and countercharges, this force lost 15
officers and 406 other ranks. But they held. On 20th April about 260 men
of the East Surrey Regiment crawled forwards over the dead and mangled
bodies of their comrades to reinforce the position. The German barrage
and counterattacks continued with, if anything, increased ferocity.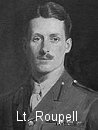
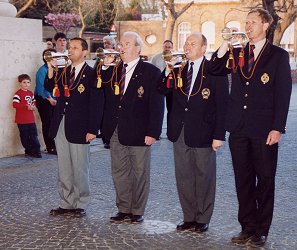 Later
that evening most of us once again attended the Last Post Ceremony under
the Menin Gate. By a pleasant coincidence Jacque, our guide from
Boezinge, was on duty in one of his other roles as a member of the Last
Post Committee. Tonight he delivered the exaltation in a loud, clear
voice.
Later
that evening most of us once again attended the Last Post Ceremony under
the Menin Gate. By a pleasant coincidence Jacque, our guide from
Boezinge, was on duty in one of his other roles as a member of the Last
Post Committee. Tonight he delivered the exaltation in a loud, clear
voice.